Touring the Two Gardens

Touring the Two Gardens
Both of these private gardens can be visited by groups from two to twenty. Contact Moria at moriainsantafe@yahoo.com for information. Click on the photo here to go to the TP blog.

Tuesday, November 24, 2009

Amaryllis; Indoor beauty for the winter

With its huge, brilliant, long-lasting blooms, amaryllis is well worth cultivating. This is especially true when you can keep them year after year. With a little space outside to fatten the bulb over the summer, you can make these beauties a treat you look forward to every winter.

Set in a pool of sunshine in our kitchen in deep winter, one Amaryllis bulb provided this glorious sight.

While not fragrant, these bulbs more than make up for that deficit with huge visual appeal!

In order to keep your bulbs blooming each year, it is important to think of them as a crop, rather like an onion. After all frost danger in the spring, take the bulbs out of their pot and replant them in a well-prepared garden bed with ample sun, water, and nutrients. Allow them to grow there until just before the first frost in the fall. Then repot them (they may need slightly larger pots) in well-drained potting soil and bring inside. Remove only damaged leaves; do not take off all the foliage. With this treatment you can have flowers every year from the same bulb, which makes the rather hefty price tag ($8 to$20 each) a little more tolerable!

These African flowers have been greatly altered by many years of selection, particularly by Dutch plant breeders. They come in a range of colors, from white, pale pink, apricot, coral, orange, scarlet, red, burgundy, to almost black. Lovely blends, stripes, and picotee markings have been achieved, and some have a green throat, which I especially like. Some are quite tall, and with their top-heavy blossoms may require staking. Much shorter varieties are also available, which may be more practical. To me these look a bit out of proportion.

Fancy double flowers with ornately recurving petals and delicate coloration are the ultimate in amaryllis beauty. I love the sculptural quality of the huge petals. I have also been amazed by the iridescent rainbow sheen on the petals in the sunlight seen only with close examination. These are almost magically enlarged flowers, making me think of Georgia O'Keefe and Alice in Wonderland. How could you not love them?

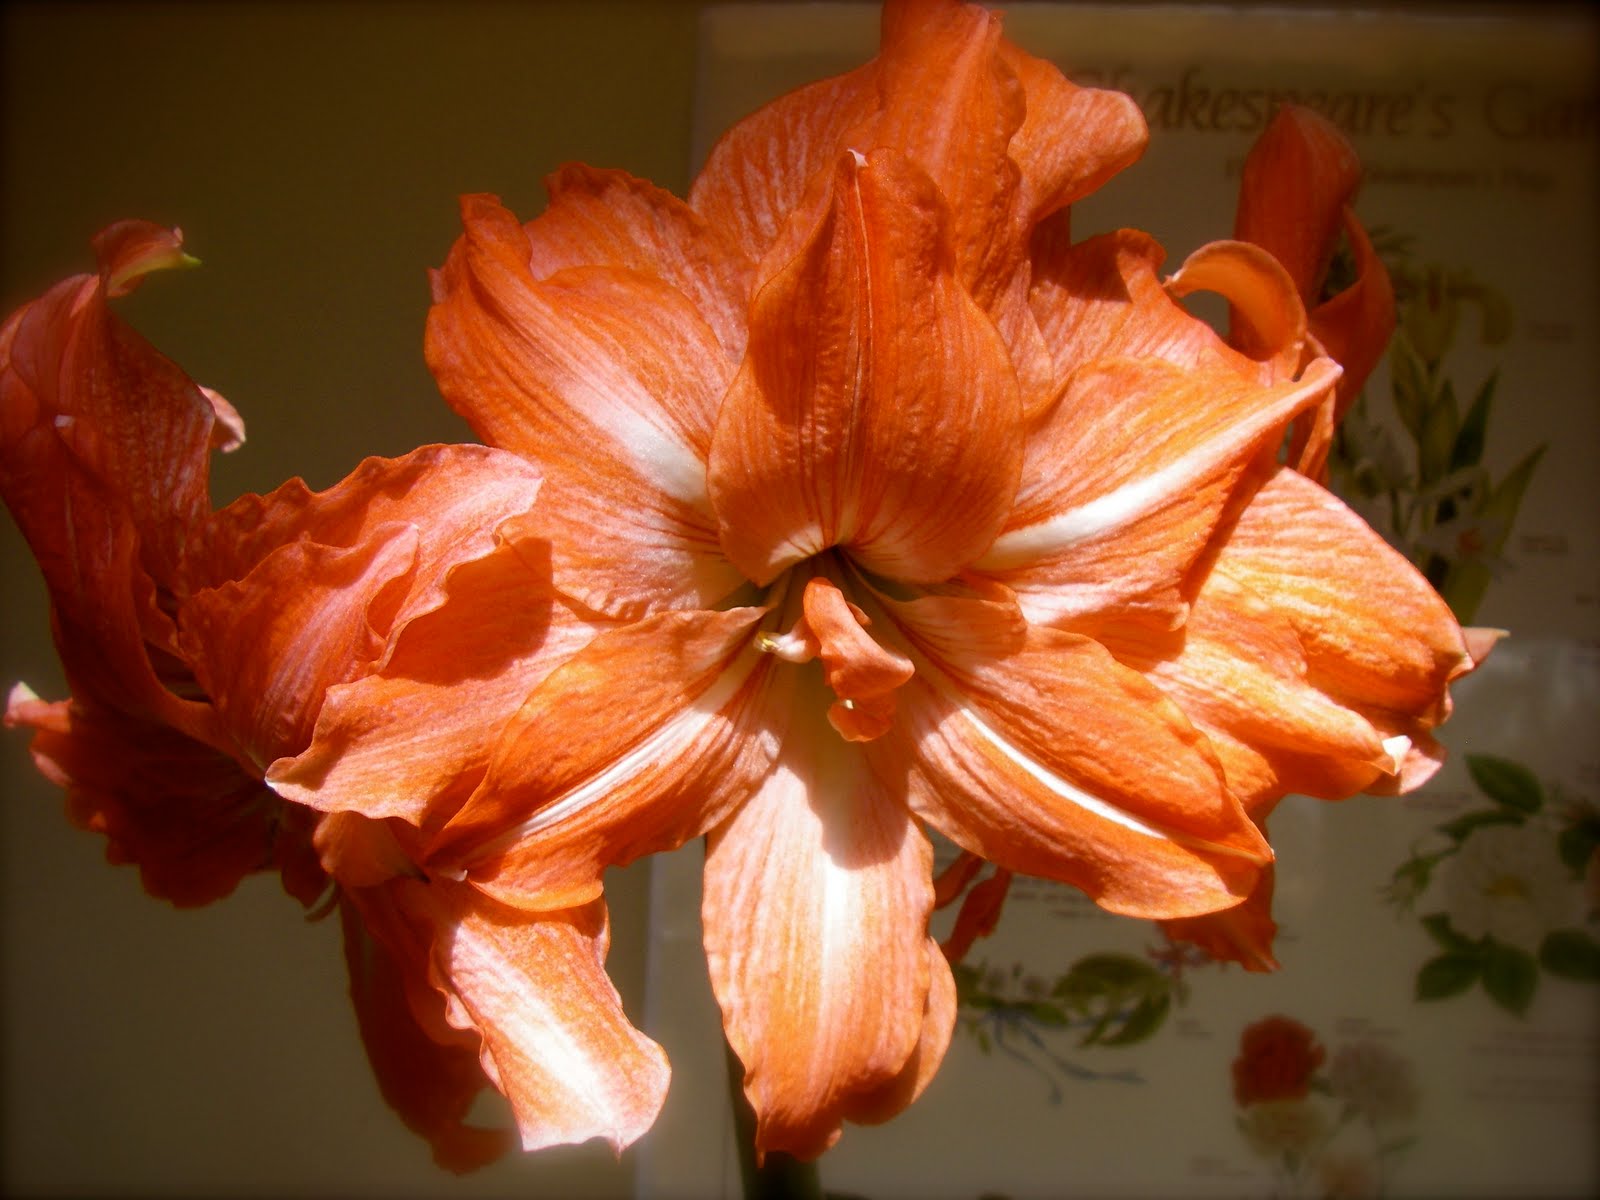
In winter when the gardens in Santa Fe lie dormant, we keep 20 or more amaryllis bulbs in separate pots in a sunny laundry room for Mrs. B's delight. Each year it seems she can't resist getting one or two more. As the buds begin to emerge we bring them into her sunroom, where they are placed to good advantage.

With the grande dame amaryllis blooms interspersed among other winter flowering plants, such as hibiscus, jasmine, and bougainvillea, the sunroom becomes a glorious jungle! Some of the plants are deliberately chosen for fragrance, which makes up for the showier blossoms' lack of scent.

As you can see from the bouquet of freshly picked daffodils, this photo was taken in April. The Amaryllis collection at LQ comes into bloom over a five or six month period, which means that one or two bulbs will be in bloom at any given time throughout the cold months. Note the stakes on these long-stemmed flowers, as well as the abundant foliage, which I feel adds to their appeal. So this season adopt an amaryllis, give it a good home with year-round love, and it will return that love with a gift of beauty that will brighten your winters for many years to come!

Wednesday, November 18, 2009

More early spring bulbs from LQ


Now is the last chance here in the high desert to get bulbs in the ground. As long as the soil is unfrozen and the bulbs are in good condition, you can still plant. The rule of thumb for planting depth is to dig a hole three times the depth of the bulb length. A pinch of balanced organic fertilizer, and some bone meal will help to keep the bulb nourished, and promote future bloom. Allow the foliage wither naturally so all the energy will go back into the bulb. The best situation is to have bulbs planted with perennials which will cover the fading bulb foliage. True geraniums work perfectly, but there are many other choices.

A wonderful naturalizer, over the years Scilla siberica has filled out this border edge nicely, creating a swath of deep blue-violet at the edge of this raised bed.

Besides coming in a wide range of colors, popular hyacinths have the additional attribute of being richly fragrant. Plant them where you can catch a whiff!

One of my personal favorites, Puschkinia scilloides is a little-known charmer originating in Turkey. To fully appreciate the delicate blue line etched into the center of each crisp white petal, it's necessary to go in close. Puschkinia is easy to grow in well-drained soil.

Anemone blanda, also known as wind anemone, brightens a shady border. The bulbs of this lovely spring ephemeral are particularly difficult to distinguish top from bottom. When in doubt I plant it on edge. It is available in white, pink, and dark blue as well as the clear light blue pictured. Here it is paired with muscari armeniacum, for a color echo. This is listed as a Zone 6 plant, and Santa Fe is officially Zone 5b (the warmer part of Zone 5). I find that you can push hardiness by planting near a wall or pavers. I have seen a definite warming trend over the past ten years here, and many Zone 6 plants are surviving well. It is always a gamble, but often worth trying.

Muscari "Valerie Finnis" is a particularly elegant variety with its bicolored flower heads. It sets off Narcissus "Thalia" to good effect. Note the guest supping nectar.


Thursday, November 12, 2009

Fruit trees in Santa Fe

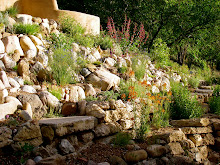
Santa Fe is high and sunny, which makes for a pleasant four season environment, but causes problems for fruit trees. The intense sunlight can trick the trees into blooming much too early. Then a cold snap or snow is bound to come along and kill the poor innocent little blossoms, leaving us with no fruit! This picture was taken on April 2, and the apricot , always adventurous, is already starting to burst into bloom.

Here is the grand old apricot at LQ, a week later, in full, glorious bloom.

That same year, at TP, the apricot in front of our house has already had its blossoms blasted by freezing night time temperatures. But as long as some buds don't open until after a killing frost, there is still a chance for fruit. The blooms which are turning brown had frozen, but new ones open each day. Hope springs eternal!

But that night it snowed, and the blooms were burdened with an inch of snow the next morning. No fruit again!

Two days later we got yet another snowfall. Don't get me wrong; I love spring snows...we always need the moisture! But we've yet to pick a single apricot from this tree, and it's 11 years old! The problem is the placement. It is on a south-facing slope. This means it gets a lot of direct winter sunshine, and blooms earlier than it should. Best to place early bloomers on a north-facing slope or on the north side of a building to avoid this problem.

And here is another beautiful show on April 16th of crabapple blossoms. Some trees seem more tolerant of cold than others. We always get crabapples!

Pruning Fruit Trees

I am no expert on fruit tree care, but local nurseryman Gordon Tooley of Tooley's Trees is. I attended a very good workshop he gave a couple of years ago in early March on pruning, and I thought my photos from that day would provide some useful illustrations for a winter task which many find confusing.

In this shot we see a young tree, probably about three years old. It has already been pruned the year before for shape. Take note of the angle of the branches; they spread out from the trunk with a wide angle. Just three or four well-spaced main branches is desirable. However, the water sprouts from the base of the tree must be removed.

Gordon held onto every little branch he cut, rather than dropping them on the ground. Between trees he sprayed his pruners with a bleach solution he carried in a spray bottle. All this was for disease prevention. The pruned branches could be used for grafting if one was that ambitious.

He pruned to open up the interior of the tree, and to eliminate crossed branches. As a rule of thumb, there should be room for a bird to be able to fly through a fruit tree without brushing its wings on the branches. Fewer branches means that the tree sends more energy to the fruit, so it gets bigger. It also means better air circulation for disease resistance, and facilitates harvesting.

Where three branches emerged from one point he has cut one out to leave the two which were the best placed. Note that the cut is near the trunk. A well done cut like this is placed barely outside of the ring at the base of the branch. This ring, if left intact, will continue to grow, allowing the tree to seal the cut over time. He also removes branches growing at too tight an angle, which would result in a weak joint that could later break under the weight of the fruit.

Here's an example of a poorly done cut from the year before. It was made too far from the trunk, and the bark peeled away as well. These flaws are the result of hurried, careless work, or a lack of knowledge. Such mistakes can open the tree up to disease. A cut like this can lead to heart rot and shorten the life of the tree. Look for the "dotted line" that shows you where to make your cut.

Here's a well-established orchard which had been neglected for many years. The trees have become overgrown and are now producing undersized fruit. They need thinning to return to productivity.

Originally this tree was pruned properly, and has a nice shape, but it needs a good thinning to restore it. A bird would have a tough time flying through that tangle! A stricter standard calls for being able to throw a cat through the branches...must've been a cat-hater that came up with that one!

Here you can see water sprouts which were allowed to grow. Obviously, even if you wanted to keep some to fill in a hole, there are too many for the tree to support. Suckers like these can rob the older well-placed branches of water and nutrients, and will eventually take over.

Timing is important for pruning. Late winter is a good time, as disease organisms are dormant and not liable to get into the cuts. The lack of leaves makes the branch structure obvious, and eases the entire process. However, winter pruning does cause sucker growth.

One of Mrs. B's favorite quotes from one of the English garden writers she loves (sorry I've forgotten which one) is "growth follows the knife". It's quite true. Whenever you prune you are liable to stimulate a reaction in the tree to produce more vegetation. This is a survival mechanism, to tolerate browsing by herbivores. It hasn't been long since trees had BIG herbivores with which to coexist and coevolve (giant ground sloths...think about it!). But if we prune we need to continue maintaining the trees to optimize their form for production.

Monday, November 9, 2009

Animals at TP

Here's our dog Cassidy, thwarted by the Cadillac of Compost Bins. The old compost pile was still there when the bins were first made. A pile needs to be at least four or five feet tall in the center when it is first built in order to have enough mass to hear up properly. It can be any length, and is always tuned in one direction: towards the garden. New material is added at the end away from the garden and finished material is removed at the end closest to the garden. Handy that way. But the dogs tended to dig up tasty scraps and made a mess of things, so the new bins were built.

About ten years ago a Mennonite family moved to TP and brought milk goats and chickens. Although they have since moved on, the goats and chooks remain.
There are now separate co-ops for each. A few families take care of the chickens and gather eggs. We like to let the chickens run in the goat pen, as we get a lot fewer flies when they can scratch around and eat the larvae.

Our goats are sable Saanens, the largest dairy goat and heaviest producer. These are our second generation, born here, and around seven years old. We love the milk! The co-op for the goats is made up of a mixture of TP residents and neighbors. These goats happen, by an odd coincidence, to be descendants from the herd we used to get milk from in the Santa Cruz mountains when we lived there! This is Becca, looking expectantly for a treat.

Here is Kat with the three kids she had this spring. As you can see, they love tree leaves and bark more than anything, making them useful in controlling the very invasive Siberian elms that were introduced to Santa Fe before they knew better. More on these elms later. Anyway, I have to give the goats credit. We have a nicely self-contained system thanks to them. We get loads of milk and cheese and yogurt, and a handy source of manure for the garden to boot!

Sunday, November 8, 2009

Composting

A good compost pile is the backbone of a good garden. I like to have a hot compost, above 140 degrees Farenheit, preferably. The hot temperature is the result of microbes digesting the organic matter in the pile. Hot compost kills weed seeds and pathogens. However, some people prefer cold compost, which is easier to make, but takes longer. Anytime you put together a large pile of organic matter and water it will eventually decay. Don't feel daunted if you can't put up a Cadillac Compost Bin like we have. Just a pile will work, as long as it is big enough. Compost happens!

We used to just have a compost pile, which worked but was messy, especially after some of the community dogs developed a taste for rotted kitchen scraps. So the community agreed to invest in some really fine bins. I based the design on the ones we had been using at LQ, which Alec, the compost king, had built. But these bins are even better. There are four bins, each four feet wide and six feet deep by five feet high. The front is made of 1" X 10"s which slide into place between grooves. Between the bins there's a similar system in the front half of the dividing separation. The back half and the outside are reinforced wire mesh.

My husband Steve, the reigning regent of the veggie garden at TP, has taken on the composting duties as well. He likes seeing the magical transformation of waste into black gold. Finished compost is black and crumbly, with no smell. It is essential for organic gardening.

There are four bins in all. We use the left bin, Bin A, to accumulate chopped organic material. Kitchen scraps not fed to the goats and chickens, like onions, coffee grounds, and citrus peels go into the small tin trash can so he can properly integrate them into the pile. Bin B is the newest pile, made from a mixture of the goat and chicken pen mucked out material, the chopped weeds and prunings from bin A, and kitchen scraps all. These materials are layered like lasagna, watered as they go in. The whole pile is topped with a layer of straw or dry leaves.

The compost gets turned twice a year. It's a big job and does take some muscle. Definitely better with a few folks taking turns...that's one of the advantages of cohousing. Before the biannual mucking, we turn the piles to empty Bin B so it's ready to receive the new compost. Bin D, on the far right, is the oldest, and has been emptied by then. So the pile in C goes into D, then B is turned into C, leaving B empty for the new pile. The compost goes mostly to the veggie garden, which is close at hand. Some makes its way to the ornamental gardens as well, adding valuable nitrogen and organic matter to our sandy soil.

Here Steve turns the pile from one bin to the next. You can see how useful the removable slats between the bins are. The turning speeds up the process, as material that had been squashed on the bottom winds up on the top, and everything is mixed up, making material more accessible to the tiny organisms that are working on it.

I often liken building a compost pile to making bread. Both depend on biological activity to work, and require a familiarity with getting the right balance of ingredients. As Steve turns the material, he fluffs it with a practiced toss of the pitch fork. This adds air into the pile, which is necessary for biological activity. Meanwhile I add water with a hose. I use a brass shut-off valve to control the spray and am careful not to overwater, which would cause the pile to go anaerobic. It should feel like a damp sponge. Without any water, there would be no decomposition.

Because our manure comes from the goat pen, it is often trampled into hard layers. Here he breaks up the clods with a Japanese farmer's hoe, which we got from Seeds of Change. "Get the right tool for the job!" sez Mr. Natural.

On one of our Community Days, we see another cohousing resident cutting sunflower stalks into short lengths before they are put into the bin. This is an important step; chopped material breaks down much more quickly, and doesn't cause problems when turning the pile.

The finished product enriches the veggie garden in the early spring before planting. We love our compost bins; now we have a neat pile and no more sick dogs! The soil here is very low in organic matter and the sunlight is so intense that it burns it up quickly. If we didn't make compost we'd have to buy it to be able to do a vegetable garden. But since we have the animals and lots of organic waste at hand, it makes sense to nourish the land, and ultimately ourselves, this way.

Wednesday, November 4, 2009

A trio of Narcissi

A fancy more-than-double daffodil, possibly Narcissus minor var. pumilus, known as 'Rip van Winkle'.

A modern hybrid daffodil...this one appears to owe some of its genes to Narcissus poeticus.

My favorite of all this genus is the perfectly formed 'Thalia'. With its graceful swept-back petals it reminds me of a white dove in flight. This is a modern hybrid of N. triandrus which dates back to 1916. It does better than many others in our climate, and is especially elegant under early white-blooming shrubs in dappled shade.

Unusual species tulips at LQ

I'm not sure of the identity of this diminutive species tulip. Can anyone help?

Another unidentified shortie. These were probably all purchased from McClure and Zimmerman, so I can figure it out by reading the catalog descriptions. This is where good permanent labels are valuable, or good mapping and organizational skills. I confess, this is part of why I am blogging: to make up for my lack of the above!

Tulipa tarda with Scilla siberica makes a nice combination. Both are from central Asia.
Tulipa saxatalis is from Crete. As you can see, many of these blbs come from dry, rocky places. They appreciate a place that bakes in the summer.

Tulipa clusiana is a tall, graceful beauty native to Iran. Who knew?

We planted quite number of species tulips in the rock gardens at LQ. This charming little one looks like Tulipa fosterana, which originates in Central Asia. The higher elevations of the Southwest US have much in common climatically with that region. We order species tulips from McClure and Zimmerman, since they propagate their bulbs, rather than collecting from the wild. Such collecting can have devastating impacts on wild populations, and we need to avoid purchasing from any company that does it.

Old Reliable

Tired of flat tires, broken handles, and cheap fittings that don't hold up? Just get one of these! My husband's grandfather's wheelbarrow, with its metal wheel, has never failed us. It sits outside year-round and gets zero maintenance. Good luck finding one, though...it has to be almost 90 years old! They just don't make 'em like they used to!